
How to Start a Saltwater Reef Tank: A Complete Guide
Starting a saltwater reef tank is a journey, not a sprint. It breaks down into four main stages: the planning and gear selection phase, the aquascaping stage with your rock and sand, the crucial nitrogen cycle, and finally, the exciting part—slowly adding your first inhabitants. From an empty glass box to a living ecosystem with its first fish, you're looking at a timeline of about 6-10 weeks. Patience isn't just a virtue here; it's a requirement.
Your First Dive into Reef Keeping
Welcome to what is, without a doubt, one of the most rewarding hobbies on the planet. Setting up a vibrant saltwater reef tank can seem intimidating from the outside, but it’s completely doable when you break it down into manageable steps. The goal of this guide is to get you confident and excited before you even spend your first dollar.
Think of this less like setting up a fish tank and more like cultivating a delicate underwater garden. A reef tank is a living, breathing ecosystem where fish, corals, and countless microorganisms all depend on each other. Getting a handle on this basic biology is your first real step toward success. Your job isn't just to keep fish alive, but to create a stable world where everything can truly flourish.
What to Expect on Your Journey
The road to a stunning reef tank has several distinct phases, and each one is critical for the long-term health of your system. You’ll go from staring at an empty tank to watching your first coral open up, with each step building on the last.
Here are the fundamental pillars you need to build on:
- Patience is Paramount: Time is your single most important tool. Rushing the setup, especially the biological cycling phase, is the number one reason new reefers fail.
- Stability is the Goal: Corals and other marine life don't chase perfect numbers on a test kit; they crave stability. Your mission is to maintain consistency in temperature, salinity, and water chemistry, not to constantly tweak and adjust.
- Research Before You Buy: Impulse buys are the enemy of a successful reef tank. Whether it's a fish that will outgrow your tank in six months or a piece of equipment that doesn't match your goals, unplanned decisions almost always lead to headaches.
The worst thing for a reef aquarium is often the hobbyist. We tend to chase faster growth or better color, making constant changes. Often, the best approach is to maintain stability and let the ecosystem find its balance with minimal intervention.
This hobby is also exploding in popularity, with new tech making it easier than ever to get started. The global reef aquarium market is on track to hit over USD 11 billion by 2030, driven by huge leaps in filtration, lighting, and monitoring that take a lot of the guesswork out of it. You can dive into the market trends and drivers in the full research report. This growth is great news for you—it means more support, better gear, and a massive community to lean on for help.
Reef Tank Setup At a Glance
Here's a quick overview of the key phases you'll encounter on your reef-keeping journey, giving you a clear roadmap from start to finish.
| Phase | Primary Goal | Key Considerations |
|---|---|---|
| Phase 1: Planning & Gear | Decide on tank size, budget, and the type of reef you want to keep. | Tank type (AIO vs. custom), filtration method (sump, HOB), lighting for corals, budget for livestock. |
| Phase 2: Aquascape & Setup | Assemble the tank, stand, and equipment; create the rock structure. | Curing live rock, choosing sand or bare bottom, plumbing, initial water mixing. |
| Phase 3: The Nitrogen Cycle | Establish a healthy biological filter to process waste. | Adding an ammonia source, testing for ammonia/nitrite/nitrate, having extreme patience. |
| Phase 4: Adding Livestock | Slowly and methodically introduce your first fish, inverts, and corals. | Quarantine new arrivals, proper acclimation, choosing hardy first inhabitants, stocking slowly. |
Each of these phases is a critical building block. Taking your time and getting each one right will set you up for a beautiful, thriving reef that you can enjoy for years to come.
Selecting Your Tank and Core Equipment
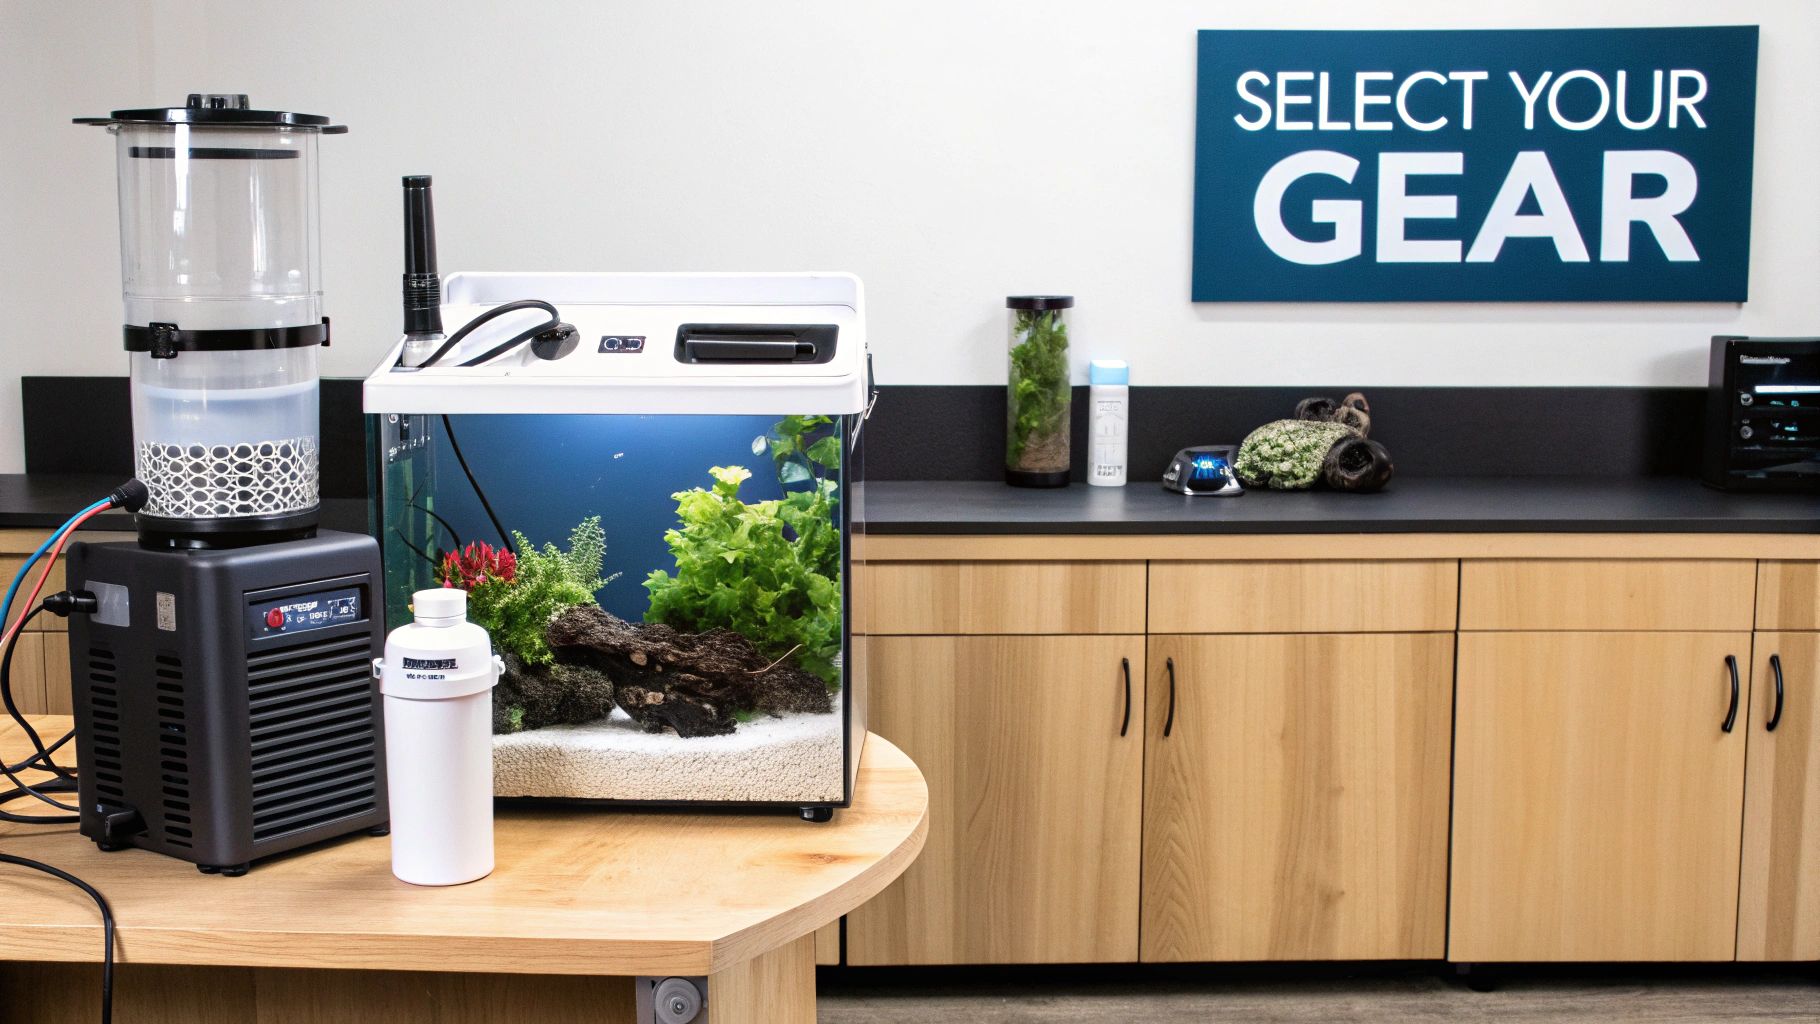
This is where the dream starts to take shape. Building a vibrant reef tank starts with a solid foundation, and that foundation is your gear. I can't stress this enough: choosing smart, reliable equipment from the get-go will save you a world of headaches and money down the road. It’s not about buying the most expensive toys; it’s about creating a stable world for your future inhabitants.
The first big choice is the tank itself. It's tempting to start small with a cute little nano tank on your desk, but trust me on this one—bigger is better, especially for beginners. A larger volume of water is far more forgiving. Small tanks are prone to wild swings in temperature and water chemistry from even minor mistakes.
If you're just learning how to start a saltwater reef tank, the sweet spot is usually in the 30- to 60-gallon range. This gives you enough water volume to buffer against common beginner errors without becoming an overwhelming or crazy expensive project. It's the perfect balance of stability and manageability.
All-In-One Kits vs. Custom Setups
Once you’ve settled on a size, you’ll run into two main styles: All-In-One (AIO) kits and custom setups that use a sump.
An All-In-One (AIO) tank is designed for simplicity. It has built-in filtration compartments hidden away in the back, creating a really sleek and compact look. All your gear—heaters, pumps, filter media—gets tucked neatly out of sight without any complex plumbing. They are incredibly beginner-friendly.
On the other hand, a custom setup with a sump uses a second, smaller tank (the sump) that sits in the stand below. Water from the main tank drains down into the sump, where all the heavy-duty filtration gear lives, and a return pump pushes clean water back up. It’s more involved to set up, but it offers way more flexibility and hides every last piece of equipment.
Here's a quick breakdown to help you figure out what's right for you:
| Feature | All-In-One (AIO) Tank | Custom Setup with Sump |
|---|---|---|
| Simplicity | High (Basically plug-and-play) | Low (Requires plumbing skills) |
| Equipment Space | Limited | High (Tons of room) |
| Water Volume | As listed on the box | Increased (The sump adds volume) |
| Aesthetics | Clean, self-contained look | All equipment is completely hidden |
| Best For | Beginners and smaller spaces | Hobbyists who want max flexibility |
For most newcomers to the hobby, an AIO is a fantastic starting point. It gets the technical stuff out of the way so you can focus on mastering water chemistry and keeping your animals happy.
The Non-Negotiable Hardware
No matter which tank style you go with, a few pieces of equipment are absolutely essential. Cutting corners here is a recipe for disaster.
Aquarium Lighting This is probably the single most important piece of gear you'll buy for a reef tank. Corals are photosynthetic animals, meaning they literally use light to make their own food. The wrong light will slowly starve them.
LED lighting is the king of the reef world today. It gives you incredible control over the light spectrum and intensity. Your choice of light really depends on what kind of corals you dream of keeping.
- Soft Corals & LPS (Large Polyp Stony): These are fantastic beginner corals and are generally less demanding. A light that puts out 30-150 PAR (Photosynthetically Active Radiation) where they'll be sitting is plenty.
- SPS (Small Polyp Stony): These are the more "advanced" corals that need very strong, high-quality light, often in the 200-400 PAR range.
For something like a standard 40-gallon breeder, a quality LED like an AI Prime 16HD or a Kessil A360X gives you fantastic coverage and control for almost anything you'd want to grow.
Water Movement Out on the reef, water is always moving. We need to recreate those currents in our tanks to bring food to corals, wash away their waste, and help with gas exchange. The tools for this job are powerheads or wavemakers.
A good target is to turn over your tank's entire water volume 10 to 20 times every hour. So, for a 40-gallon tank, you're looking for powerheads that can move a combined 400 to 800 gallons per hour (GPH). Pro tip: using two smaller powerheads on opposite ends of the tank is way better than one big one. It creates a more random, chaotic flow that corals love.
Filtration and Water Purity Pristine water is everything in this hobby. And it all starts with the water you use to make your salt mix. Never use tap water. It’s loaded with chlorine, heavy metals, and other gunk that will do nothing but fuel ugly nuisance algae. A Reverse Osmosis Deionization (RODI) system is an absolute must-have. It strips your tap water down to pure H₂O, giving you a perfect blank slate.
Inside the tank, your main filtration will come from live rock (more on that soon), a protein skimmer, and maybe some chemical media.
A protein skimmer is a total workhorse. It yanks organic waste out of the water before it has a chance to break down into nitrate and phosphate. It’s a nutrient export machine. If you have a sump, it’s a non-negotiable piece of gear. For AIOs, you can find great little nano skimmers that fit right into the back chambers.
If you want to get into the nitty-gritty science of keeping your water perfect, feel free to check out our guides on water quality and filtration.
Temperature Control Our tropical reef critters are happiest in water between 75-78°F (24-26°C). Keeping that temperature rock-solid is the job of a reliable aquarium heater. The rule of thumb is 3-5 watts of heating power per gallon. For our 40-gallon example, a 150- to 200-watt heater is just right. I always recommend spending a few extra bucks on a separate temperature controller. It’s cheap insurance against a heater getting stuck in the "on" position and cooking your entire tank.
Designing Your Underwater Landscape
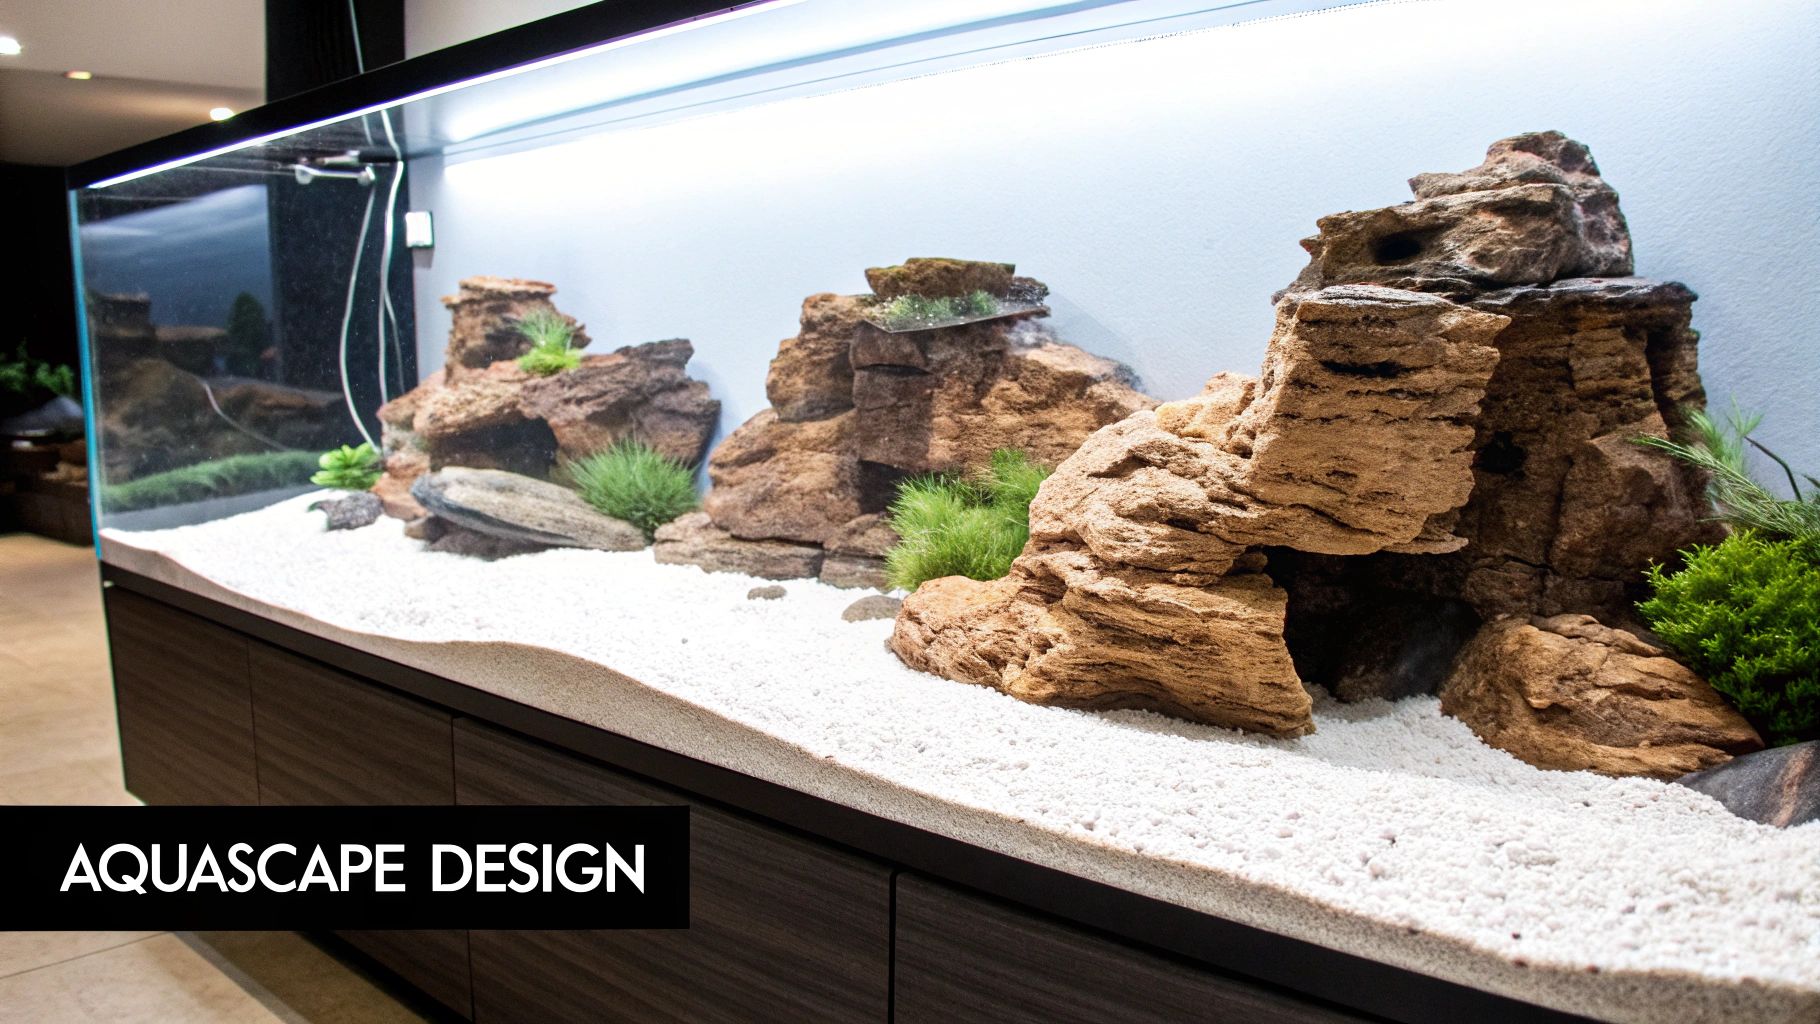
This is where the real fun begins. Aquascaping is much more than just arranging rocks to look cool—it's about creating a functional, stable foundation for your entire ecosystem. The choices you make here with your rockwork and sand will directly influence everything from water flow and coral placement to the long-term health of your reef.
The first big decision revolves around your rock. This "hardscape" is the absolute backbone of the tank, providing the surface area for biological filtration and creating homes for your fish and future corals. Getting this right is a critical first lesson in how to start a saltwater reef tank the proper way.
You've got three main routes to go, and each comes with its own set of pros and cons.
Choosing Your Foundation Rock
Your choice between live, dry, or artificial rock really sets the tone for your tank's entire journey. There isn't a single "best" answer here; it all boils down to your budget, how patient you are, and what your ultimate goals are.
- Live Rock: This is the classic choice—rock straight from the ocean, already covered in beneficial bacteria, coralline algae, and tons of other micro-critters. It’s the ultimate shortcut to seeding a tank with life, but it comes with the risk of introducing unwanted hitchhikers like Aiptasia anemones or stubborn nuisance algae.
- Dry Rock: Think of this as natural ocean rock that has been completely dried out, making it sterile. It's guaranteed to be pest-free and is usually easier on the wallet. The trade-off? It needs to be "cured" to leach out phosphates that can become algae fuel down the road.
- Artificial Rock: These man-made structures are lightweight, totally pest-free, and sustainably made. They often come in fantastic, dynamic shapes that are hard to find in natural rock. The downside is that they are typically the most expensive option and start with zero biological life.
Curing dry rock isn't optional; it's essential. Just stick the rock in a container of heated saltwater with a powerhead for about 2-4 weeks. This simple process pulls out trapped phosphates, saving you from a massive algae headache months after your tank is set up.
Building Your Aquascape
Once you have your cured and ready rock, it’s time to get creative. The goal is to build something that's both stable and visually interesting. A key principle is to create "negative space"—think open channels, caves, and overhangs. These features give fish places to swim and hide, which dramatically reduces their stress and makes the whole tank feel more alive.
Whatever you do, avoid the classic "wall of rock" piled against the back glass. This is a recipe for disaster, creating dead spots where detritus collects and nutrient problems begin. Aim for open, multi-layered structures instead. Use an aquarium-safe epoxy or super glue to lock key pieces together, so you don't have to worry about a rockslide later on.
Selecting the Right Substrate
The substrate, or sand bed, is another key player. While some high-flow, specialized tanks go bare-bottom, most hobbyists—especially beginners—will want a sand bed. It provides that natural reef look, offers more surface area for beneficial bacteria, and becomes a home for all sorts of interesting sand-sifting critters.
The depth of your sand bed matters. For most reef tanks, a shallow bed of 1-2 inches is the sweet spot. It's deep enough to look good and let certain animals burrow, but not so deep that it traps waste and creates nasty anaerobic zones.
Grain size also makes a difference:
- Fine Grain ("sugar-fine"): Looks stunning and is perfect for sand-sifting gobies, but strong powerheads can easily create a sandstorm.
- Coarse Grain (crushed coral): Stays put even in high flow but tends to trap more detritus, meaning you'll need to vacuum it more often.
For most people running a mixed reef, a medium-grain aragonite sand hits that perfect middle ground, balancing great looks with practical maintenance.
Mixing Your First Batch of Saltwater
With the hardscape and sand in place, it's finally time to add water. The number one rule here is to always use RODI (Reverse Osmosis De-Ionized) water—never, ever use tap water.
Grab a clean, food-grade container and fill it with your RODI water. Add a heater and a small powerhead to get the water circulating and warmed up to your target temperature, usually around 77°F (25°C).
Slowly add your chosen salt mix, following the manufacturer’s directions. It's typically around ½ cup of salt per gallon of water. Let it mix for at least a few hours, or until the water is crystal clear and you can't see any undissolved salt.
The last step is to check your salinity with a calibrated refractometer. You're shooting for a specific gravity of 1.025-1.026. Once your temperature and salinity are locked in, you can carefully start filling your tank. Your underwater world is officially one step closer to coming alive.
Mastering the Aquarium Nitrogen Cycle
If there's one tool every reefer needs, it's patience. And nowhere is that more true than when you're waiting for the nitrogen cycle to complete. This is the invisible, biological engine that will power your entire aquarium, and letting it mature is absolutely non-negotiable.
Think of it like building the entire waste management system for a tiny city before a single resident is allowed to move in.
The process itself is a pretty cool example of nature at work. You add an ammonia source to the tank, which becomes food for the first type of beneficial bacteria. These little guys consume toxic ammonia (NH₃) and convert it into nitrite (NO₂), which is still toxic. Then, a second type of bacteria shows up to the party, eats the nitrite, and converts it into the much less harmful nitrate (NO₃).
This whole chain reaction, from ammonia all the way to nitrate, usually takes 4 to 8 weeks. Rushing this is probably the single biggest mistake new hobbyists make, and it's a surefire way to lose fish.
Kickstarting Your Biological Filter
So, how do you get this cycle started? You need to provide that initial shot of ammonia. A few tried-and-true methods work great here; the goal is just to add a consistent "ghost" waste load to feed those growing bacterial colonies.
Here are the most common ways to do it:
- The Shrimp Method: A classic for a reason. Just drop a single piece of raw shrimp from the grocery store into your tank and let it decay. It slowly releases ammonia, giving the bacteria a steady food source.
- Bottled Bacteria: Lots of great products on the market contain live, dormant bacteria. Dosing these as directed can give your cycle a massive head start by seeding the tank with the exact bacteria you need from day one.
- Pure Ammonia: If you're the scientific type, you can dose pure, unscented ammonia (like Dr. Tim's Ammonium Chloride). This gives you precise control over ammonia levels, but you have to be careful with the dosing.
Whichever method you go with, the key is consistency. Add your ammonia source, and then walk away. Resisting the urge to constantly mess with things is half the battle; just let biology do its thing.
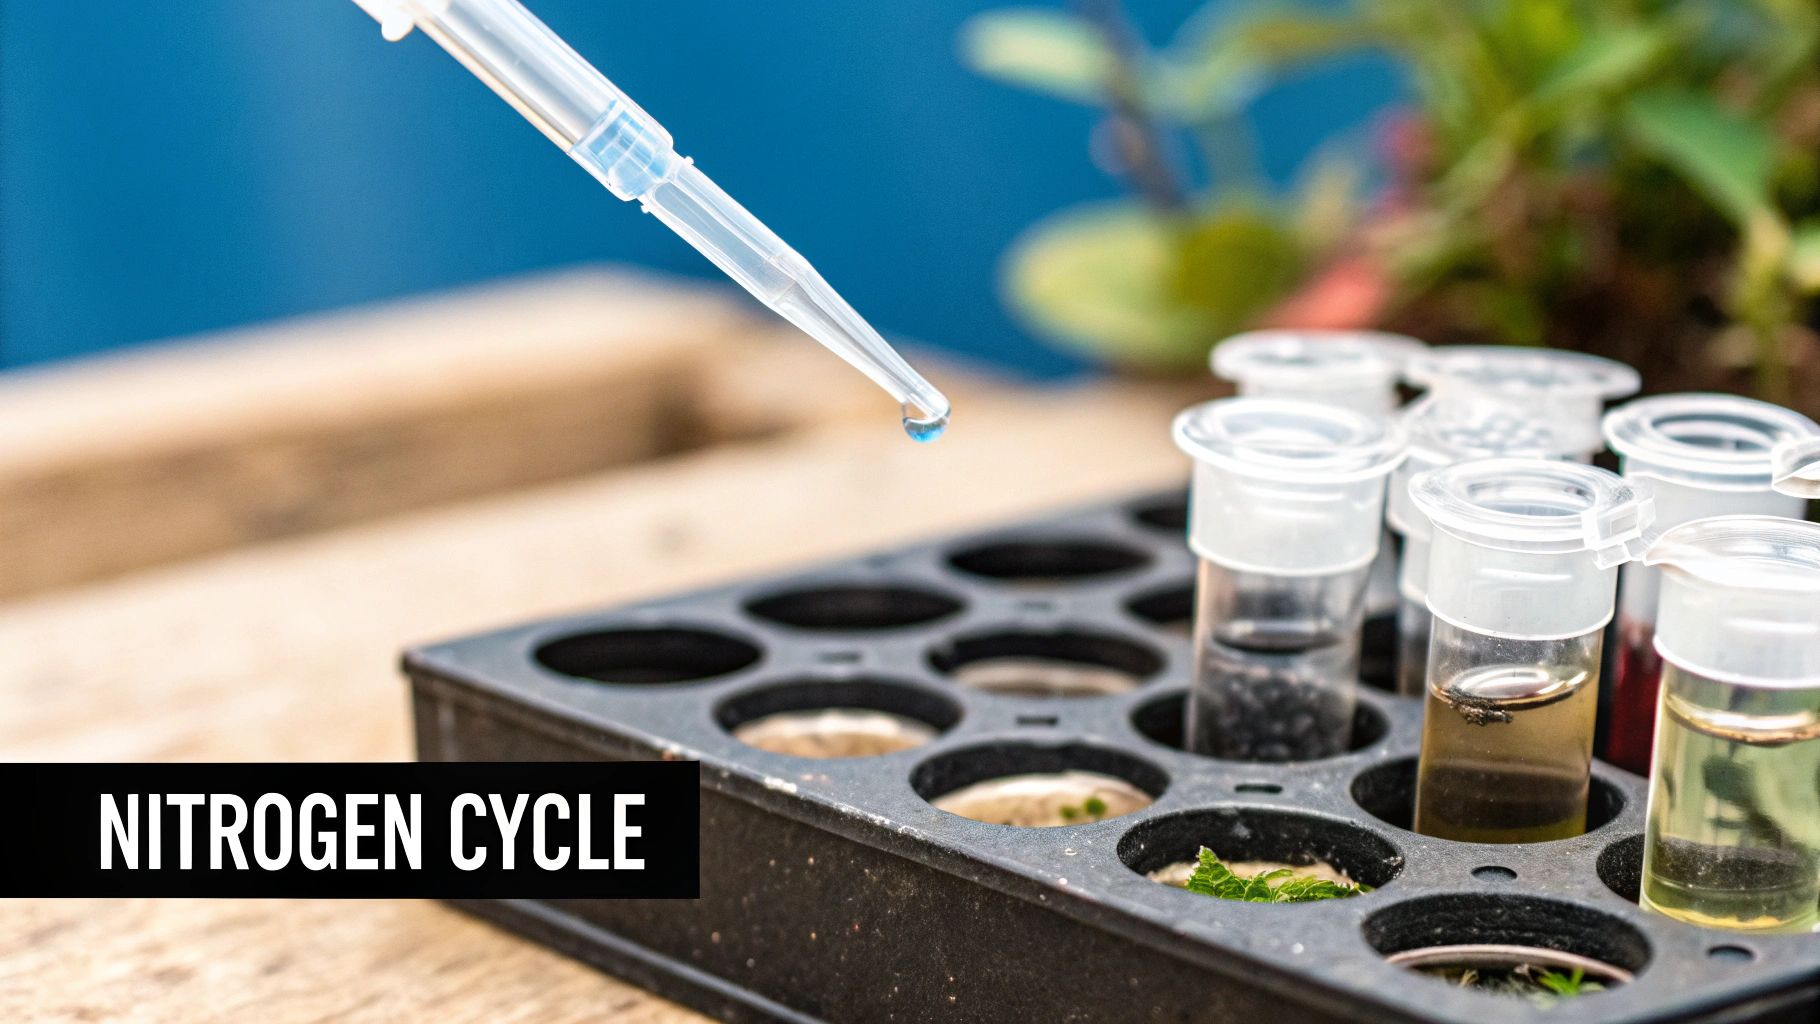
Reading the Signs: Is It Working?
Okay, so how do you know if anything is actually happening in there? This is where your water test kits become your best friend. You'll want reliable tests for ammonia, nitrite, and nitrate. Testing your water every couple of days will paint a very clear picture of the cycle's progress.
You're looking for a predictable pattern of spikes and falls:
- Ammonia Spike: First, you'll see ammonia levels shoot up. Within a week or so, they'll start to fall as the first bacteria colony gets established.
- Nitrite Spike: Just as the ammonia is dropping, your nitrite levels will go through the roof. This is the sign that stage two of the cycle is kicking in.
- Nitrate Rise: Finally, as the second type of bacteria multiplies, nitrite will fall to zero. At the same time, you'll see your nitrate levels start to rise.
Your cycle is officially done when—and only when—your test kits show 0 ppm ammonia and 0 ppm nitrite for several days in a row, while showing a detectable level of nitrate. Once you hit that milestone, it's finally safe to think about adding your first fish.
Seeding Your Tank for Long-Term Success
While the nitrogen cycle takes care of the chemical waste, a truly mature reef tank has a bustling microscopic food web. This is where seeding your tank with live microfauna, like copepods and amphipods, becomes a total game-changer.
Adding these critters early, even during the last few weeks of your cycle, helps establish a resilient ecosystem right from the start. This simple step is a cornerstone for maintaining excellent reef tank ecosystem balance.
These tiny crustaceans are workhorses. They provide a natural, continuous food source for many fish and corals, and they also act as a clean-up crew, munching on detritus and leftover food that would otherwise rot and fuel ugly algae growth.
By adding a healthy population of pods from a source like PodDrop, you give your new tank a massive head start on building that natural biodiversity. It ensures your future fish will have a self-replenishing food source ready and waiting from the moment they get in the tank.
Adding Your First Fish and Corals
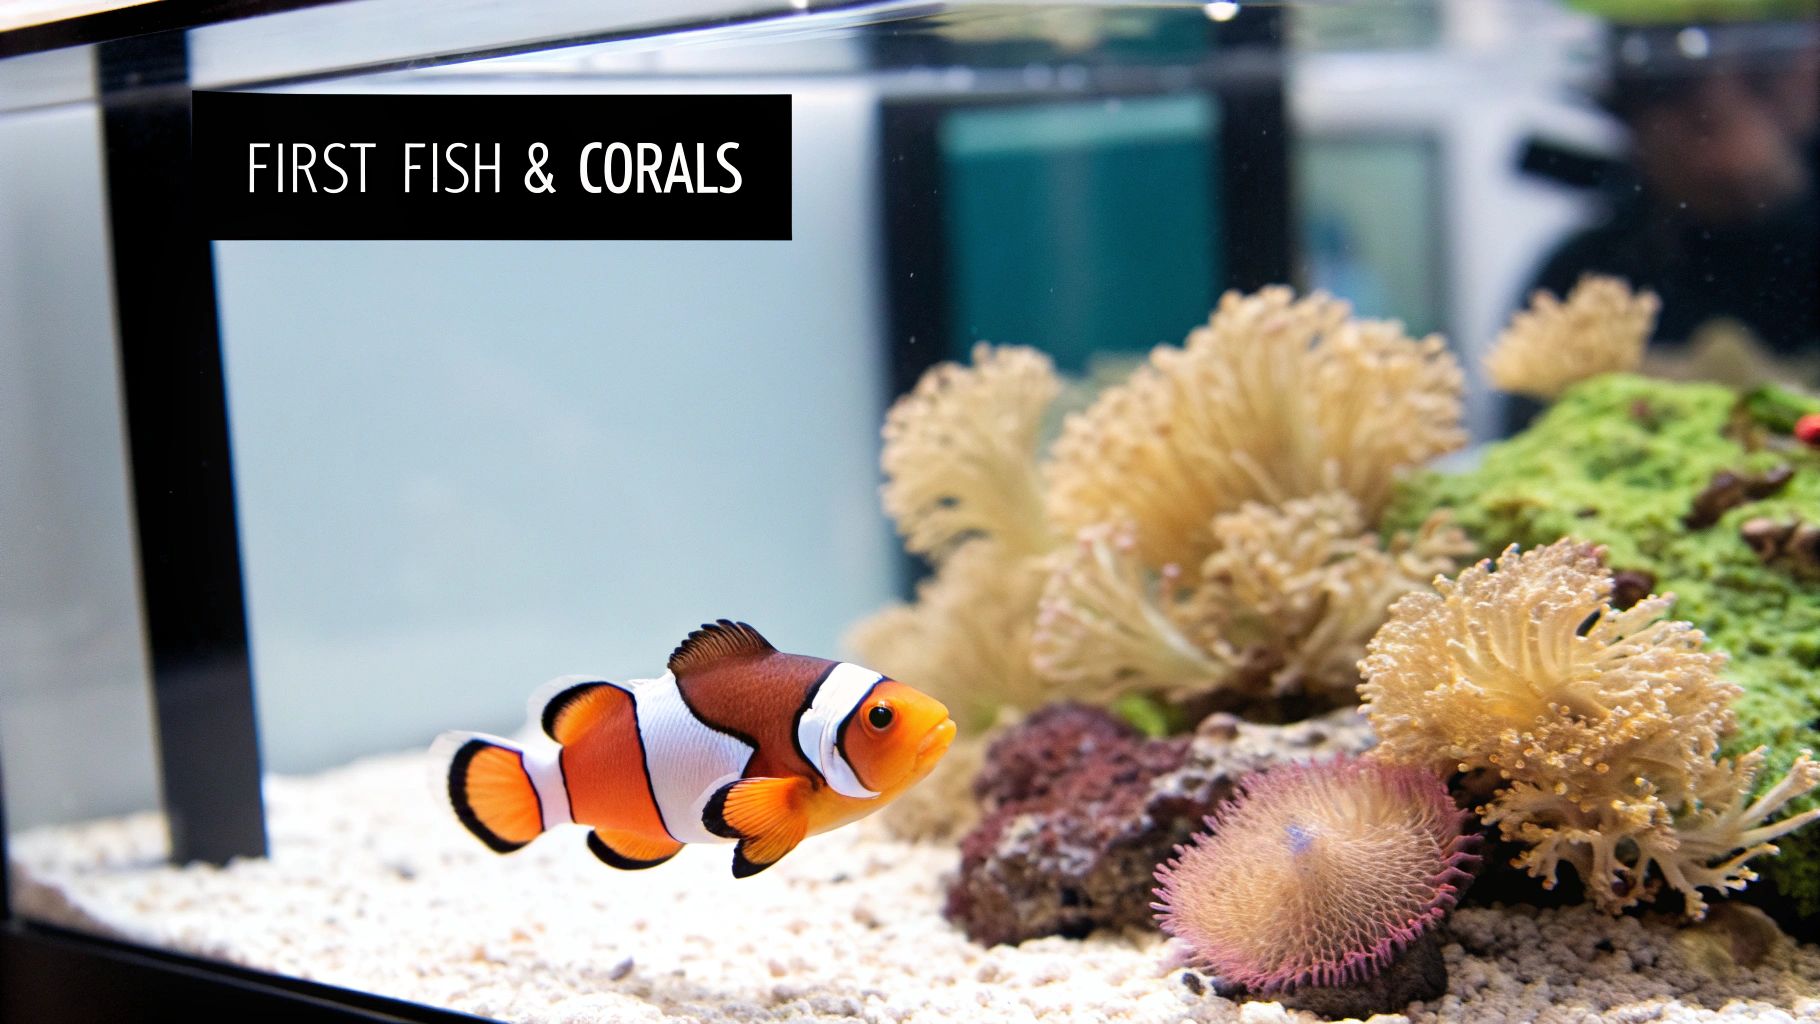
This is the moment. After weeks of patiently watching your tank cycle, testing your water, and seeing those ammonia and nitrite levels finally hit zero, your system is biologically ready to support life. Adding your first inhabitants is, without a doubt, the most exciting part of this journey, but it’s also where patience pays the biggest dividends.
The number one mistake new reefers make here is adding too much, too fast. Your brand-new biological filter is established, but it's still finding its footing. Throwing too many fish in at once bombards it with waste, which is a surefire recipe for a new ammonia spike that can wipe everything out.
The golden rule is simple: start with one or two small fish, and give your system at least two weeks to adjust before even thinking about adding anything else.
Choosing Your Pioneer Fish
Your first fish need to be more than just pretty faces; they need to be tough. These "pioneer" fish are the first to truly test your tank's stability, so picking hardy, captive-bred species is the smartest move you can make. Luckily, some of the most iconic reef fish are also the most resilient.
Here are a few fantastic choices for your first additions:
- Designer Clownfish: Ocellaris and Percula clowns are the poster children of the hobby for a reason. They're captive-bred, famously hardy, and packed with personality.
- Firefish Gobies: These elegant fish are peaceful, stay small, and bring a beautiful pop of color. Just be warned—they are notorious jumpers, so a tight-fitting lid is non-negotiable.
- Watchman Gobies: If you want character, look no further. A Yellow Watchman Goby will often pair up with a pistol shrimp, creating a fascinating symbiotic duo that’s endlessly entertaining to watch.
- Royal Gramma: With its stunning split purple-and-yellow coloration, the Royal Gramma is a reef tank classic. They’re generally peaceful but can get a little territorial about their favorite cave.
Proper Acclimation is Key to Survival Fish are incredibly stressed after being bagged and transported. Tossing them straight into the tank is a massive shock to their system. The best method is drip acclimation, where you slowly drip your tank water into their bag over 30-60 minutes. This gives them time to gradually adjust to your water's specific temperature, salinity, and pH, dramatically improving their chances of survival.
Your First Resilient Corals
Once your fish have been in the tank for a few weeks and your water parameters are holding steady, it's time to think about corals. Just like with fish, we start with the easy, forgiving stuff that won't throw a fit if things aren't absolutely perfect.
Soft corals and certain Large Polyp Stony (LPS) corals are the perfect entry point. They're far more tolerant of the minor swings in water chemistry that are common in a new tank.
Some of the best beginner corals include:
- Zoanthids and Palythoas: These colorful button-like polyps are practically bulletproof. They come in an endless variety of colors and grow quickly, making them a great way to paint your rockwork.
- Mushroom Corals: If there's one coral that's almost impossible to kill, it's a mushroom. They thrive in lower light and flow, making them super easy to place.
- Leather Corals: Species like Toadstool or Cabbage leathers add amazing texture and movement. They are incredibly resilient and can become impressive showpieces over time.
- Hammer and Frogspawn Corals: These classic Euphyllia corals are a fantastic introduction to stony corals, with beautiful, flowing tentacles that bring life to any reef.
Building a Harmonious Community
A peaceful tank doesn't happen by accident; it happens by design. Before you buy any fish, you need to research its temperament and, just as importantly, its adult size. Some fish are notorious coral-nippers (many angelfish and butterflyfish), while others are just plain bullies.
The marine aquarium trade is a massive industry, valued at around $2.15 billion. As responsible hobbyists, we support its sustainability by choosing captive-bred animals and creating stable, long-term homes for them. Thoughtful stocking is a huge part of that stewardship.
The same planning applies to corals. Certain LPS corals, like Torches, have long "sweeper" tentacles that will sting and kill anything they can reach. You have to give them a wide berth and plan for their growth to prevent future coral warfare.
The Unsung Heroes: The Clean-Up Crew
Last, but certainly not least, is your clean-up crew (CUC). This motley crew of snails, crabs, and shrimp are your 24/7 janitorial staff. They are constantly at work, munching on nuisance algae, eating leftover food, and keeping your sandbed stirred.
The best time to add them is a couple of weeks after your cycle completes, right when you start to see that first dusting of algae. This ensures they have something to eat from day one.
A solid starter CUC for a 40-gallon tank might look like this:
- 5-10 Astrea Snails: Algae-eating machines for your glass and rocks.
- 5-10 Nassarius Snails: These guys live under the sand, popping up like zombies when they smell food.
- 2-3 Cerith Snails: Great all-around cleaners for rocks, glass, and sand.
- 1 Emerald Crab: A fantastic scavenger with a particular taste for pesky bubble algae.
- 1 Skunk Cleaner Shrimp: More than just a scavenger, this shrimp will set up a "cleaning station" and remove parasites from your fish.
Building your tank's population slowly and deliberately is the final, critical piece of the puzzle. By making careful, researched choices, you'll create the thriving, beautiful ecosystem you've been dreaming of. A healthy population of microfauna is also essential; for more on that, check out our beginner's guide to live copepods.
Common Questions for New Reef Keepers
Getting your first reef tank is an incredible feeling, but it definitely opens up a floodgate of questions. Don't worry, we've all been there. Getting clear, no-nonsense answers from the start can be the difference between a tank that thrives and one that struggles.
Let’s cut through the noise and tackle some of the most common things new hobbyists ask. Understanding these basics is how you build the confidence you need to grow a stunning underwater ecosystem.
How Long Does a Tank Cycle Really Take?
You'll hear a lot of different answers, but a brand-new saltwater tank typically takes anywhere from 4 to 8 weeks to cycle. There's no getting around this waiting period—it's when the essential beneficial bacteria set up shop to handle the toxic ammonia and nitrite that will be produced by your future inhabitants.
Rushing this is hands-down one of the biggest mistakes you can make. Sure, you can try to speed things up with live rock from an established tank or a good bottled bacteria product. But at the end of the day, your test kits have the final say. You're not done until you see zero ammonia and zero nitrite. Only then is it safe to even think about adding fish.
The waiting game is the hardest part. The temptation to add a fish to that beautiful, empty tank is immense. But delayed gratification is the secret ingredient to long-term success in this hobby. Patience now prevents heartache later.
What Are the Biggest Beginner Mistakes?
Besides jumping the gun on the cycle, a few other classic mistakes tend to trip up newcomers. Just being aware of them puts you way ahead of the curve.
- Stocking Too Quickly: It’s so easy to get excited and add a bunch of fish or corals at once. This overwhelms your new biological filter and leads to dangerous ammonia spikes. The key is to go slow—add just one or two critters every few weeks to let the system catch up.
- Chasing Perfect Numbers: Stability is king in a reef tank. It's far more important than hitting some "perfect" number on a chart. Constantly dosing chemicals to nail an exact parameter often causes wild swings that stress corals more than anything.
- Skipping Quarantine: That new fish looks perfect at the store, so why not add it straight in? This is exactly how pests and diseases like ich get into a pristine display tank. A simple, separate quarantine tank is the best insurance policy you'll ever have.
- Inadequate Equipment: Skimping on your gear will always come back to bite you. A light that's too weak for the corals you dream of having or a powerhead that creates poor flow will only lead to frustration and unhealthy livestock.
How Often Should I Do Water Changes?
When your tank is new and lightly stocked, a 10-20% water change every one to two weeks is a fantastic routine to lock in. This simple task is a true cornerstone of reef-keeping success.
Water changes do two crucial things for you. They replenish the essential trace elements that your corals are constantly using up to grow their skeletons. At the same time, they dilute and export nutrients like nitrates and phosphates that, if left to build up, will just become fuel for nuisance algae. Consistency here, especially in your first year, will pay off big time.
A thriving reef is a complete ecosystem, from the things you can see to the microscopic life you can't. You can kickstart that biodiversity and give your corals and fish a natural, self-sustaining food source with PodDrop Live Reef Nutrition. Our lab-grown copepods and phytoplankton are the key to building a resilient, vibrant food web from the ground up. Give your new reef the live nutrition it's craving at https://www.getpoddrop.com.
Article created using Outrank